
Category: The Web » Tutorials, Optimization, and SEO
How to backup Blogger Blogspot settings, posts and comments? If I am not mistaken, backing up your blogspot posts and comments was almost impossible; it requires some sort of third party software. Gone are the good old days when everything was done via backdoor. Blogspot has changed a lot, every time I log in there are new features, new discoveries. I guess it is about time they introduce the ‘BackUp’ function.
Related Article 😍💰👉 6 FeedBurner Alternatives – RSS Feed Newsletter For Bloggers


- Step 1 – Go to ‘Settings’
- Step 2 – Click on ‘Others’
- Step 3 – Click on ‘Export Blog’
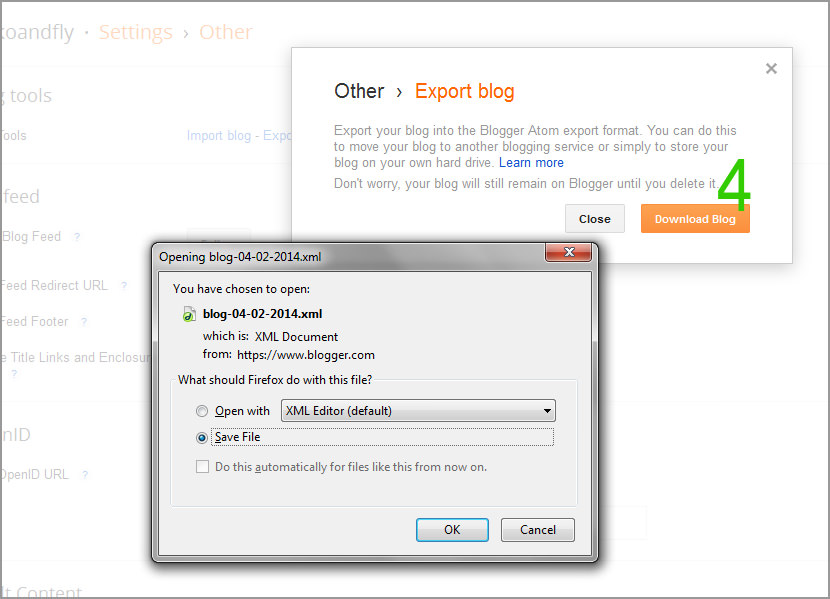
- Step 4 – A window will pop out. Click ‘Download Blog’ to backup your post and comments.
The download manager will appear, save the XML file to your computer. To upload your blog, ‘Settings’ –> ‘Basic’ –> ‘Import Blog’


the export blog feature includes the back up of posts and comments?
thank you lots for notifying us newbs about this function xD
was even contemplating 3rd party software until i came across your post lols
thanks again :)
Thanks! This was useful! I’m in the process of changing my blog over to wp from blogger, and wanted to save everything beforehand just in case I messed something up!
Hello, how could I do articles backup using new Blogger interface? I can’t understand that… thanks!
I want to download blogger .